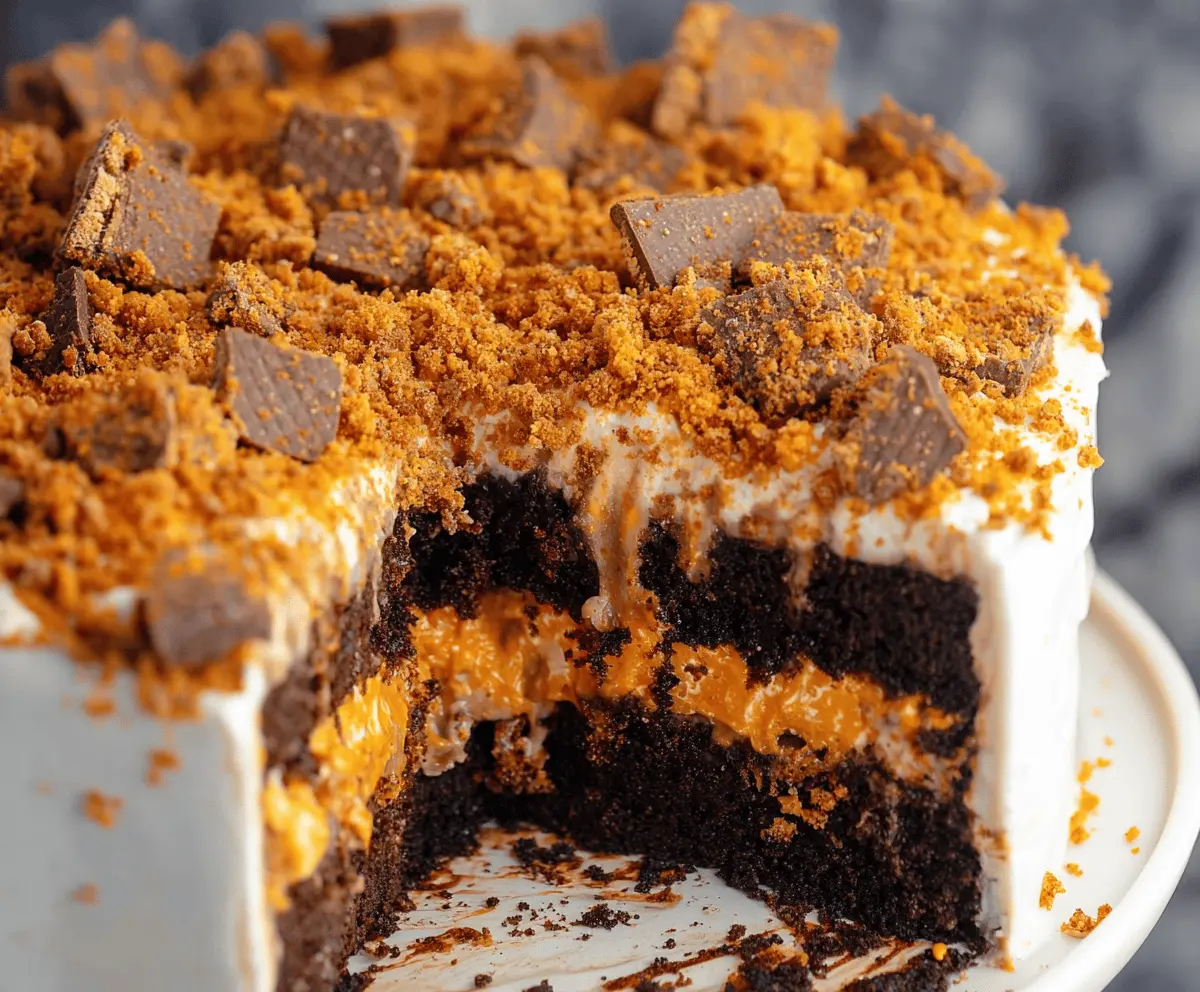
This Butterfinger Cake is a sweet treat that combines rich chocolate and crunchy Butterfinger bars. It’s moist, decadent, and so easy to make—perfect for any dessert lover!
You can’t go wrong with layers of cake and creamy frosting topped with crushed Butterfinger bits. I can never resist stealing a piece before dinner. Who can blame me? 😄
What I love most is how simple it is to whip up. Just bake, layer, and let it chill. It’s a fun dessert that impresses everyone without much fuss!
Key Ingredients & Substitutions
Chocolate Cake Mix: This is the base of your cake. While a boxed mix is super convenient, feel free to use your favorite homemade chocolate cake recipe if you’re up for it! Just ensure the texture is moist to complement the cream cheese layer.
Cream Cheese: Softened cream cheese creates a rich filling. If you’re looking for a lighter option, Greek yogurt can be a good substitute, but it won’t have the same creaminess. Whipped mascarpone could also add a nice twist!
Heavy Whipping Cream: Essential for that fluffy topping. If you’re in a pinch, you can use regular whipping cream, but avoid products labeled as “whipped topping” since they contain additives that won’t hold as well.
Butterfinger Candy Bars: These add incredible crunch and flavor. For a nut-free option, consider using crushed Oreos or toffee bits. You could also use homemade peanut butter brittle for a similar texture!
How Do I Get My Cakes to Cool Properly?
Cooling your cakes properly is vital to avoid a soggy cake or losing shape. Here’s how to do it:
- Once baked, remove the cakes from the oven and let them sit in the pans for about 10 minutes.
- Carefully run a knife around the edges to loosen the cakes, then invert them onto a wire rack to cool completely. This helps air circulate around the cakes.
- Let cool for at least 1 hour, as this makes it easier to frost without melting the cream cheese frosting.
Don’t rush this step! A well-cooled cake layers up beautifully with that frosty topping.
Butterfinger Cake
Ingredients You’ll Need:
For The Cake:
- 1 box chocolate cake mix (plus ingredients called for on the box: eggs, oil, water)
For The Cream Cheese Frosting:
- 8 oz cream cheese, softened
- 1 cup powdered sugar
For The Whipped Topping:
- 2 cups heavy whipping cream
- 1/4 cup granulated sugar
- 2 tsp vanilla extract
For The Butterfinger Layer:
- 4 Butterfinger candy bars, crushed (reserve some larger pieces for topping)
- Optional: 1 cup caramel sauce or peanut butter for swirling in the middle layer
How Much Time Will You Need?
This recipe takes about 15 minutes of prep time, plus about 30-40 minutes to bake the cake, and at least 1 hour to chill once it’s done. So, in total, you’ll need around 2 hours before you can slice into this delicious cake!
Step-by-Step Instructions:
1. Preheat and Prepare:
First, preheat your oven to 350°F (175°C). Grease and flour two 8-inch round cake pans. This helps ensure your cakes come out smoothly! You can also line the bottom with parchment paper for extra insurance.
2. Bake the Cake:
Prepare the chocolate cake batter according to the instructions on the box. Once mixed, divide the batter evenly between the two prepared pans and bake them as directed. Allow the cakes to cool completely in the pans after baking!
3. Make the Cream Cheese Frosting:
While the cakes are cooling, take a medium bowl and beat the softened cream cheese with the powdered sugar until it’s nice and creamy. This will be your delicious frosting base!
4. Whip the Cream:
In a separate chilled bowl, whip the heavy cream with granulated sugar and vanilla extract. Keep whipping until you get stiff peaks. This step is key for that fluffy topping!
5. Combine the Mixtures:
Gently fold the whipped cream into the cream cheese mixture until everything is fully combined. You want it airy yet combined!
6. Layer It Up:
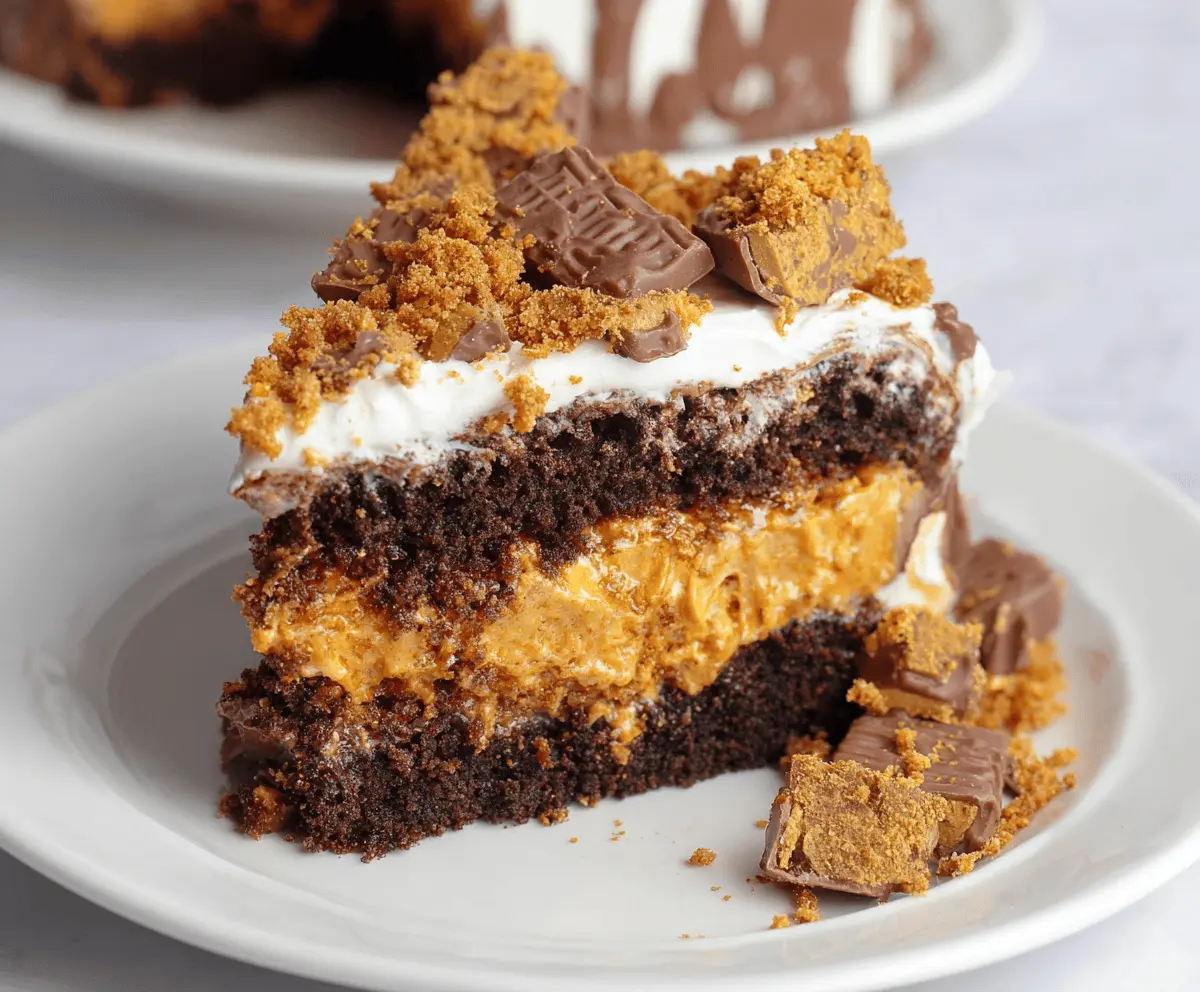
Place your first cake layer on a serving plate. If you’re using caramel or peanut butter, spread a layer on top of the cake. Then, generously spread a layer of the cream cheese whipped topping over this layer, followed by a sprinkle of crushed Butterfinger pieces.
7. Finish with the Second Layer:
Carefully place the second cake layer on top. Now, frost the entire cake with the remaining cream cheese whipped topping.
8. Top with Butterfinger:
Press those reserved Butterfinger chunks and crumbs all over the top of your cake for that beautiful finishing touch!
9. Chill and Serve:
Finally, refrigerate the cake for at least an hour before serving. This allows the layers to set and the flavors to meld together beautifully.
This Butterfinger Cake offers a moist chocolate base paired with a creamy, lightly sweetened filling and frosting, topped off with deliciously crunchy, peanut buttery Butterfinger candy. Enjoy every slice of this dessert!
Can I Use a Different Cake Mix?
Absolutely! While chocolate cake mix is traditional, you can substitute with vanilla, red velvet, or any flavor you prefer. Just keep in mind that this will change the overall flavor of the cake!
How Should I Store Leftover Cake?
Store any leftover cake in an airtight container in the refrigerator. It will stay fresh for up to 3 days. Just be sure to let it sit at room temperature for a few minutes before serving to soften the frosting a bit!
Can I Make This Cake Ahead of Time?
Yes! You can bake the cake layers a day in advance. Once cooled, wrap each layer tightly in plastic wrap and store in the fridge. Prepare the frosting on the day you plan to serve it for maximum freshness.
What Can I Use Instead of Butterfinger Bars?
If you can’t find Butterfinger bars or want a different flavor, try using crushed toffee bits, Crunch bars, or even chopped peanuts mixed with chocolate. Each will give a unique twist to the cake while still adding delightful crunch!