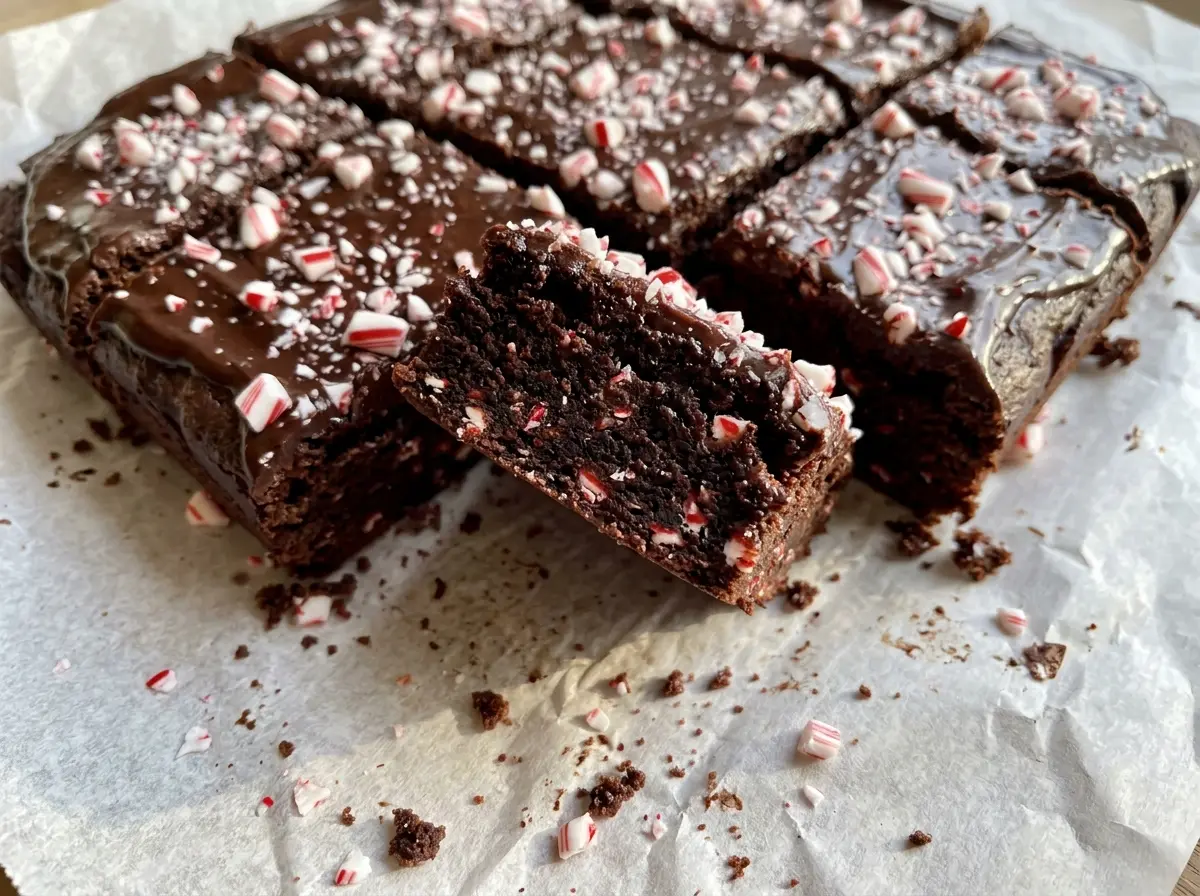
When the pan comes out, the edges look set while the middle still has a little give. The kitchen smells like cocoa first, then peppermint. I make these Candy Cane Brownies for that contrast: a soft chocolate base with a smooth ganache cap and a brittle candy cane crunch. Keeping the peppermint on top as well as in the batter means it reads clearly without overwhelming every bite.
Unsweetened cocoa keeps the brownie flavor deep, while a little peppermint extract adds a cool edge. The ganache is made with chopped semisweet chocolate and steaming cream; letting the cream sit over the chocolate before stirring gives it time to soften evenly. The one place I don’t rush is cooling. Warm brownies can thin the ganache and blur the layers when you cut them. Once everything has set, each square has a tender center, a satiny chocolate top, and a bright peppermint finish.
Kitchen Note
Leave the parchment overhang on two sides long enough to grip. Those paper handles make it much easier to lift the cooled brownies out without bending the slab.
Save these Candy Cane Brownies for a chocolate-and-peppermint treat with a smooth ganache top and a crisp candy cane finish.
Why the Candy Canes Belong on Top, Not in the Batter
The peppermint has two jobs here, and they work best in separate places. Extract gives the brownie base a gentle mint note, while the candy canes bring a sharper burst of peppermint and a crisp texture. If you fold crushed candy into the batter, the pieces bake against the moist brownie and lose the clean, brittle crunch that makes the topping stand out.
Keeping the candy canes on the ganache also gives each square a clear finish: rich chocolate first, then a little snap and sweetness. The topping acts as a cushion between the brownies and the candy, so the pieces stay visible instead of disappearing into the dark batter. Crush the canes into small pieces rather than powder; a mix of little bits and slightly larger shards looks attractive and gives you a more noticeable crunch. This layered approach lets the cocoa stay in the lead while the peppermint comes through at the end.
What Keeps the Brownies Chocolate-Forward and the Ganache Smooth

- Unsweetened cocoa powder — It gives the brownie base its concentrated chocolate flavor without adding sweetness. Use a fresh, well-stored cocoa; it’s the main chocolate note in the batter, so a stale tin will show. Dutch-process cocoa has a different acidity and flavor, so stick with unsweetened cocoa for the intended result.
- Peppermint extract — Extract brings a rounded peppermint note through the brownie rather than relying only on the candy topping. Measure it carefully because a heavy hand can make the mint taste medicinal. Peppermint oil isn’t a direct swap for extract.
- Semisweet chocolate — Finely chopped chocolate melts more evenly under the hot cream than large chunks. A good semisweet bar gives the ganache a balanced sweetness; there’s no need to buy an expensive specialty chocolate, but choose one you enjoy eating.
- Heavy cream — Its fat helps the chocolate turn into a smooth, spreadable ganache. Lower-fat milk doesn’t behave the same way here and can leave the topping too loose.
- Candy canes — Regular candy canes provide both the peppermint flavor and the brittle finish. Crush them shortly before topping if you can; fine powder tends to disappear visually, while larger pieces give the brownies a more distinct crunch.
- Eggs — Large eggs bind the cocoa-rich batter and help give the brownies their soft, cohesive middle. Bring them to room temperature if you remember, though cold eggs still work; whisk until the mixture looks smooth before adding the dry ingredients.
Mixing, Baking, and Topping the Brownies Without Rushing Them
Whisk the butter, sugar, and eggs until smooth
Heat the oven to 350°F and line an 8-inch square pan with parchment, leaving overhang on two sides. Melt the butter in a medium microwave-safe bowl, then whisk in the sugar. Whisk in the eggs, vanilla, and peppermint extract until the mixture looks even and smooth; if the melted butter is piping hot, give it a brief moment to settle before adding the eggs so they don’t scramble.
Stir in the dry ingredients just until combined
Add the cocoa powder, flour, and fine salt to the bowl. Stir until no dry streaks remain, then stop; extra mixing after the flour disappears can make the texture less tender. Scrape the batter into the lined pan and spread it into the corners so it bakes at a consistent thickness. The batter will be thick, so use a spatula to level the top rather than expecting it to flow into place.
Bake, then let the brownie base cool completely
Bake for 22 to 27 minutes, until the edges are set and a toothpick inserted near the center comes out with moist crumbs. The center shouldn’t look raw, but it doesn’t need to test completely clean. Set the pan aside and let the brownies cool completely in the pan, about 1 hour. Don’t pour ganache over a warm slab; heat from the brownie can make the topping run thin.
Make the ganache and finish with candy cane
Put the finely chopped semisweet chocolate in a heatproof bowl. Warm the cream in a small saucepan until it’s steaming, with small bubbles at the edge, then pour it over the chocolate and leave it untouched for 3 minutes. Stir until smooth and spread the ganache over the cooled brownies, then scatter the crushed candy canes over the top. Let the pan stand at room temperature for 30 to 45 minutes, until the ganache is set, before lifting the brownies out and cutting 16 squares.
Three Simple Ways to Change the Peppermint-Chocolate Balance
A softer peppermint note
Leave the peppermint extract out of the brownie batter and keep the candy cane topping. You’ll still get peppermint in each bite, but it will come mostly from the crunchy finish rather than running through the chocolate base.
A gluten-free brownie base
Replace the all-purpose flour with the same amount of a gluten-free 1:1 baking flour blend. Choose a blend made to replace wheat flour in baking, not a single-ingredient flour such as almond flour; the brownies may have a slightly different crumb, but they’ll keep their chewy brownie texture.
A less-sweet ganache
Use bittersweet chocolate in place of the semisweet chocolate, keeping the same weight. The topping will taste more intensely chocolatey and less sweet against the candy canes, though its firmness can vary a little with the chocolate brand.
Storage and Reheating
- Refrigerator: Store covered for up to 4 days. The ganache firms and the brownie feels denser when chilled; the candy cane pieces may soften a little.
- Freezer: Freeze the cut squares in an airtight container with parchment between layers for up to 2 months. Thaw them in the refrigerator overnight.
- Reheating: These are best not reheated because warmth softens the ganache and can make the candy topping sticky. Let a square sit at room temperature briefly before serving if you prefer a softer brownie.
The Candy Cane Brownie Questions That Come Up at the Cutting Board
Candy Cane Brownies
Ingredients
Equipment
Method
- Heat the oven to 350°F.
- Line an 8-inch square baking pan with parchment paper, leaving overhang on two sides.
- Melt the butter in a medium microwave-safe bowl.
- Whisk in the sugar until combined.
- Whisk in the eggs, vanilla extract, and peppermint extract until smooth.
- Add the cocoa powder, flour, and salt, and stir just until no dry streaks remain.
- Spread the batter evenly in the prepared pan.
- Bake for 22 to 27 minutes, until the edges are set and a toothpick inserted near the center comes out with moist crumbs.
- Cool the brownies completely in the pan, about 1 hour.
- Put the chopped chocolate in a heatproof bowl.
- Heat the heavy cream in a small saucepan until steaming with small bubbles at the edge.
- Pour the hot cream over the chocolate and let stand for 3 minutes.
- Stir the chocolate and cream until smooth.
- Spread the ganache over the cooled brownies.
- Sprinkle with the crushed candy canes.
- Let stand at room temperature for 30 to 45 minutes, until the ganache is set.
- Lift the brownies out using the parchment.
- Cut into 16 squares.