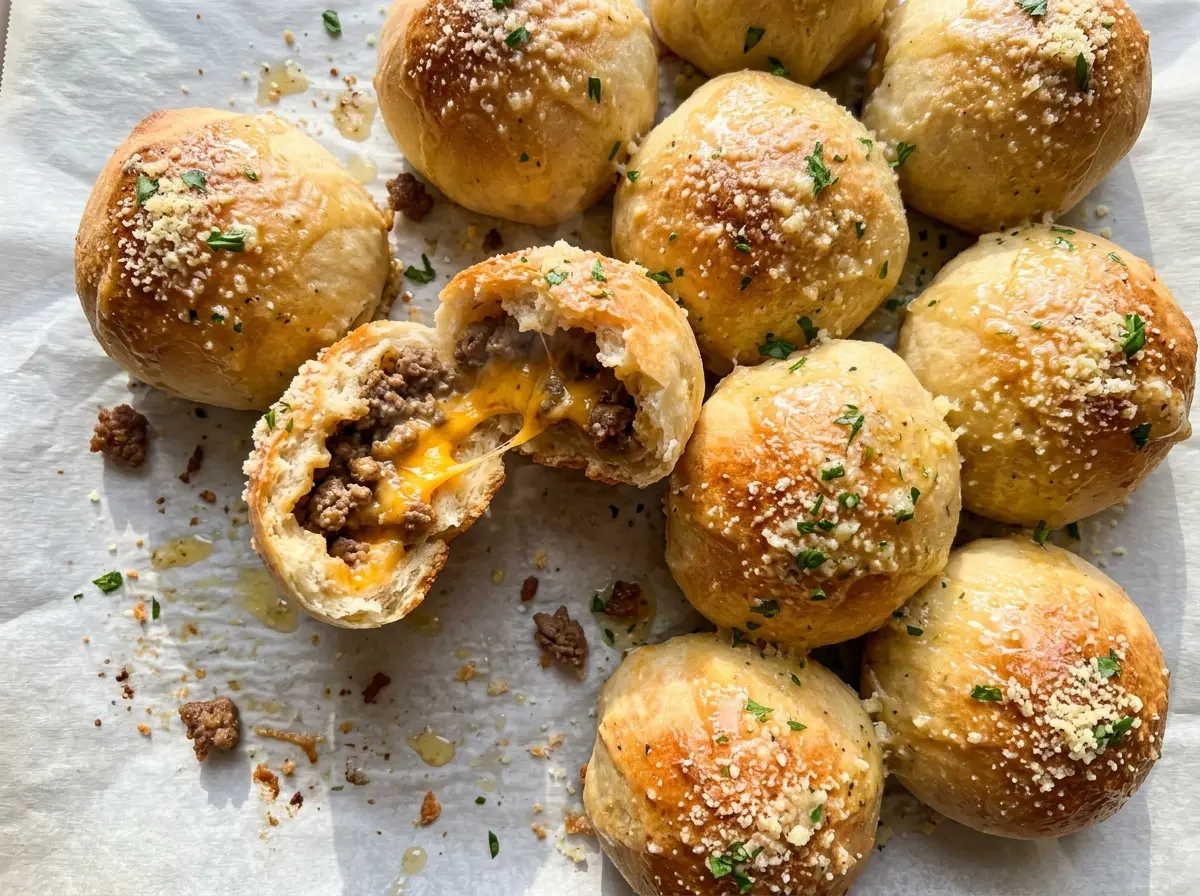
When these come out of the oven, the tops are puffed and golden, but I always check the seams before I call them done. A pale line of dough there means the filling is still working its way through the center. Garlic Parmesan Cheeseburger Bombs take the familiar beef-and-cheddar flavors and tuck them into refrigerated biscuits, so each one is easy to pick up without losing the filling on the way to the plate.
I brown the beef with onion first, then stir in Worcestershire, ketchup, and mustard after draining the extra grease. That keeps the filling savory and tangy without leaving the biscuit bottoms oily. Sharp cheddar goes in separately, and the hot baked biscuits get brushed with garlic butter before Parmesan and parsley finish the tops. The contrast between the warm, cheesy center and that salty, buttery coating makes every bite taste like a cheeseburger wrapped in a tender biscuit.
Kitchen Note
Give the cooked beef mixture the full 10 minutes to cool before filling the biscuits. Warm filling is harder to handle against the dough, and cooling it first keeps assembly neat.
Save these Garlic Parmesan Cheeseburger Bombs for a hands-on dinner with a juicy beef-and-cheddar center and a buttery Parmesan finish.
Why the Cheeseburger Flavor Belongs Inside the Beef, Not on Top
These work best when the ketchup, mustard, and Worcestershire season the beef itself. They coat the browned crumbles, so the familiar tangy, savory flavor carries through the filling instead of sitting in a separate stripe that can spill out when you bite in. The onion cooks with the beef, adding a mellow sweetness to that same mixture.
Cheddar has a different job: it stays in distinct pockets inside the biscuit. Sharp cheddar brings a clear, salty bite that balances the seasoned meat, while the garlic-Parmesan coating belongs on the outside, where it can cling to the warm biscuit. Keeping those parts separate gives you three recognizable layers rather than one blended, heavy filling. It also means you get a little Parmesan on the first bite before reaching the cheesy center.
Drain the skillet well before stirring in the condiments. A little beef flavor is welcome, but pooled grease can make the filling loose and leave the bottoms of the biscuits oily.
The Beef, Biscuit, and Cheese Choices That Shape Every Bite

- Ground beef — The 85% lean beef has enough fat for a juicy, beefy filling, with excess grease drained before the sauces go in. A leaner ground beef works in the same amount and leaves less grease, though the cooked filling may be a little firmer.
- Yellow onion — Finely chopping it helps the pieces cook through alongside the beef and fit neatly inside the biscuits. White onion can replace it in the same amount for a sharper onion flavor; yellow is the gentler choice.
- Worcestershire, ketchup, and yellow mustard — Each brings something different: savory depth, sweetness with tang, and a bright mustard bite. Use the regular versions you keep in the fridge; there’s no need for specialty condiments. If Worcestershire isn’t on hand, leave it out rather than adding extra ketchup, which would make the filling sweeter.
- Refrigerated biscuits — The 16.3-ounce can gives you eight portions that flatten into rounds large enough to enclose the filling. This is not the place for tiny biscuit pieces: the dough needs enough area to meet and seal over the center. A gluten-free refrigerated biscuit dough is the most practical swap for a gluten-free version; see the variation below.
- Sharp cheddar — Its stronger flavor stands up to the beef and condiments. Monterey Jack melts smoothly if that’s what you have, but it makes the center milder and less distinctly cheesy.
- Garlic-Parmesan topping — Unsalted butter carries the garlic powder over the hot biscuit, and finely grated Parmesan sticks to that buttery surface more evenly than coarse shreds. Fresh parsley adds a clean, green note; leave it off if needed, knowing the finish will taste richer and less fresh.
From Skillet Filling to Golden, Sealed Biscuit Bombs
Brown the beef and onion before adding the condiments
Heat a 12-inch skillet over medium-high heat, then add the ground beef, finely chopped onion, salt, and black pepper. Cook for 7–9 minutes, breaking up the beef as it browns, until no pink remains and the center reaches 160°F. Drain the excess grease before stirring in the Worcestershire sauce, ketchup, and mustard. Cook for 1 minute, then transfer the filling to a plate and let it cool for 10 minutes.
Flatten each biscuit and keep the filling centered
Heat the oven to 375°F and line a rimmed baking sheet with parchment paper. Separate the biscuits and flatten each one into a 4 1/2-inch round; rounds that are too small leave little dough to bring together over the filling. Divide the cooled beef mixture evenly among them, then add the cheddar on top. Keep the filling in the middle rather than pushing it to the edges, where it can interfere with sealing.
Pinch the seams closed before baking
Bring the dough edges up and over the filling, then pinch them firmly together so there are no visible gaps. If a little filling sits in the edge, move it back toward the center before sealing; greasy or crowded edges are harder to pinch shut. Set each bomb seam-side down on the prepared baking sheet. Bake for 18–22 minutes, until the tops are golden and the dough at the seams looks fully baked, not pale or gummy.
Brush while hot, then let the topping settle
While the bombs bake, melt the unsalted butter and stir in the garlic powder. Brush the garlic butter over the bombs as soon as they come out of the oven, while the biscuit tops are hot. Sprinkle with the finely grated Parmesan and chopped fresh parsley so they catch on the buttered surface. Let the bombs rest for 5 minutes before serving; that short pause gives the filling a chance to settle inside the biscuits.
Three Practical Ways to Adapt These Cheeseburger Bombs
Use gluten-free refrigerated biscuit dough
Replace the regular biscuits with gluten-free refrigerated biscuit dough in eight portions. Flatten and fill the rounds as you would the original dough, but handle them gently because gluten-free dough can crack more easily. Follow the package’s handling guidance and look for golden tops and fully baked seams; the texture and browning may differ from wheat-based biscuits.
Make a half batch for four
Use four biscuits and halve each filling and topping ingredient. Keep the biscuits the same size and follow the same oven temperature and baking-time range, checking that the tops are golden and the seams are fully baked. You’ll have fewer bombs without changing the balance of beef, cheese, and garlic-Parmesan topping.
Leave off the parsley for a richer finish
Skip the fresh parsley and finish the bombs with the garlic butter and Parmesan alone. The topping will taste more buttery and savory, with none of the fresh, lightly herbal note parsley adds. This is the easiest adjustment if you don’t have fresh herbs on hand.
Storage and Reheating
- Refrigerator: Store cooled leftovers in an airtight container for 3–4 days. The biscuits soften as they sit, but the filling stays tucked inside.
- Freezer: They freeze well for up to 2 months. Cool completely, wrap each bomb individually, and place them in an airtight freezer container.
- Reheating: Warm in a 350°F oven until the centers reach 165°F. The microwave is quicker but softens the biscuit, so avoid it when you want the outside to stay less soggy.
Questions That Come Up When Making Cheeseburger Bombs
Garlic Parmesan Cheeseburger Bombs
Ingredients
Equipment
Method
- Heat a 12-inch skillet over medium-high heat.
- Add the ground beef, onion, salt, and pepper; cook for 7–9 minutes, breaking up the beef, until browned and it reaches 160°F.
- Drain excess grease, then stir in the Worcestershire sauce, ketchup, and mustard.
- Cook for 1 minute, then transfer the filling to a plate and cool for 10 minutes.
- Heat the oven to 375°F.
- Line a rimmed baking sheet with parchment paper.
- Separate the biscuits and flatten each into a 4 1/2-inch round.
- Divide the cooled beef mixture evenly among the rounds and top with the cheddar cheese.
- Bring the dough edges together over the filling and pinch firmly to seal; place seam-side down on the baking sheet.
- Bake for 18–22 minutes, until golden brown and fully baked at the seams.
- Melt the butter and stir in the garlic powder.
- Brush the hot bombs with the garlic butter, then sprinkle with the Parmesan and parsley.
- Rest for 5 minutes before serving.